Nimble Streamer supports various transcoding technologies to provide our customers with the best technologies on the market. That’s why our team added integration with AMD hardware acceleration technologies.
At the moment Nimble Transcoder supports AMD Alveo™ U30 hardware acceleration card, with Alveo MA35D support coming soon. Nimble Transcoder supports live streaming transcoding only, it does not process video-on-demand files.
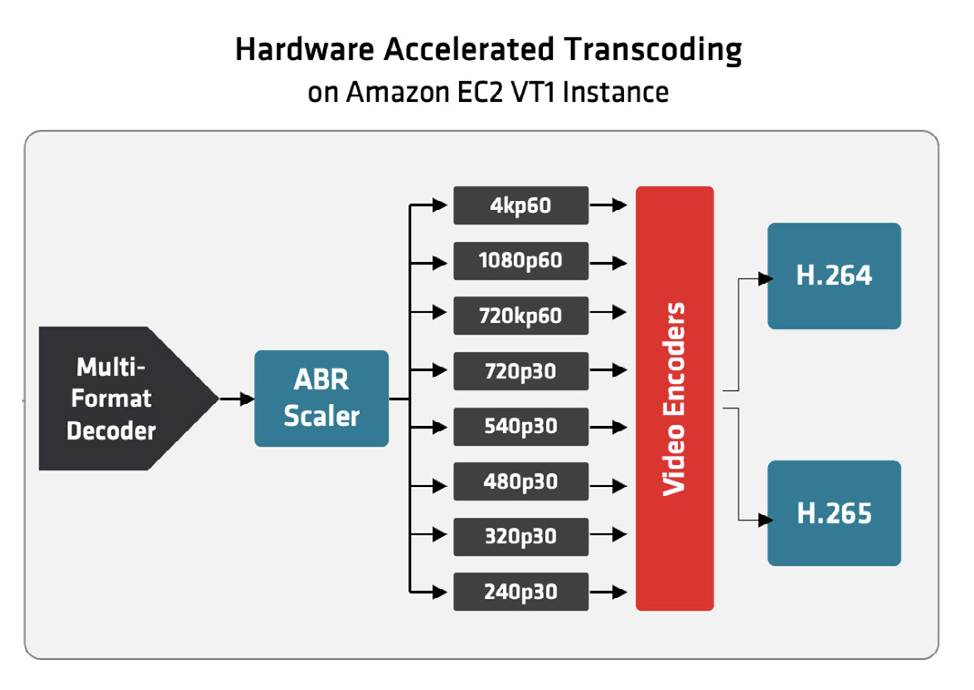
This article describes the setup of Nimble Streamer Live Transcoder on AWS EC2 VT1 instance to decode an incoming stream and create the encoding ladder with multiple renditions as output, all done with U30 acceleration card.
Prerequisites
Make sure the following items are available before proceeding further:
- AWS EC2 VT1 Instance is chosen: the appropriate EC2 VT1 instance type need to be selected based on streaming requirements. The ami-05a32ec5995f621d0 public AMI (Amazon Machine Image) with pre-installed Xilinx U30 libraries was specifically used in this guide. For more information, please refer to AWS VT1 Instance Types.
- AWS Security Groups are set up: Configure security groups to allow proper ingestion and streaming. Make sure ports for both incoming and outgoing stream traffic are correctly set up for live streaming.
- Ubuntu 22.04 is installed: Nimble Streamer with Alveo U30 support is currently available for Ubuntu 22.04. If you need some other operating system, please contact us.
- WMSPanel account is active: WMSPanel account with active subscription is required for managing Nimble Streamer in this scenario.
- Transcoder license was activated: A valid Nimble Streamer Transcoder license must be created and activated by proper payment to enable transcoding functionality.
Some experience with AWS and Nimble Transcoder is also required. This article doesn’t explain creating and setting up a virtual machine in AWS Cloud and Transcoder’s basics like creating a scenario, adding filters, etc. Learn more about Transcoder setup using articles from docs reference and in these video tutorials.
Install Nimble Streamer and Transcoder on AWS VT1
As was mentioned in the Prerequisites section above, the instance of AWS VT1 ami-05a32ec5995f621d0 AMI had been set up and launched to begin Nimble Streamer installation. This is a public image, available in the AWS Management Console or through alternative methods. Security groups need to be configured to allow SSH and streaming connections to the instance according to the required specifications. Additionally, SSH root shell access is necessary.
The image includes all Xilinx libraries required to support Alveo U30 in Nimble Streamer. This can be confirmed by running the following command, which will display the installed packages as shown below:
apt list --installed | grep xilinx-alveo-u30

xilinx-alveo-u30-core/jammy,now 3.0.1 amd64 [installed]
xilinx-alveo-u30-examples/jammy,now 3.0.3 amd64 [installed]
xilinx-alveo-u30-ffmpeg/jammy,now 3.0.0 amd64 [installed]
xilinx-alveo-u30-gstreamer/jammy,now 3.0.0 amd64 [installed]
xilinx-container-runtime/jammy,now 1.1.27 amd64 [installed,automatic]
…
Check the XRT library version is locked for updates to avoid compatibility issues:
apt-mark showhold
xrt
If the above command doesn’t show xrt, just execute
sudo apt-mark hold xrtNext step is very important. Configure Dynamic Libraries for the Transcoder by adding Xilinx libraries to the system’s dynamic linker configuration using the following command:
sudo sh -c "echo '/opt/xilinx/xrt/lib' > /etc/ld.so.conf.d/xilinx.conf"
sudo ldconfig
Once these steps are completed, the special version of Nimble and Transcoder, forked especially for Alveo U30 support, must be installed. Notice that if a regular Nimble packages are installed instead, they will work, but they will not have U30 support.
Add Nimble Streamer repository and the GPG Key for that repository:
sudo bash -c 'echo -e "deb http://nimblestreamer.com/ubuntu jammy/" > /etc/apt/sources.list.d/nimble.list'
wget -q -O - http://nimblestreamer.com/gpg.key | sudo tee /etc/apt/trusted.gpg.d/nimble.asc
Run installation commands to install a special fork of Nimble and Transcoder:
sudo apt-get update
sudo apt-get install nimble-u30 nimble-transcoder-u30
To install additional SRT package, run:
sudo apt-get install nimble-srt
Register server instance and Transcoder in WMSPanel by the following commands, providing the account name and password then prompted:
sudo /usr/bin/nimble_regutil
sudo /usr/bin/nimble_regutil --transcoder-license <transcoder_license_key>
The server will be visible in the WMSPanel panel shortly after the successful registration. Now it can be managed via WMSPanel UI for control streaming, transcoding and securing streams without the need to logging into the server.
To verify that the Alveo U30 is detected by Nimble, check the /etc/nimble/nimble.log file after starting Nimble. The log should include the following line:
[202Y-MM-DD HH:MM:SS PXXXXX-TYYYYY] [tranmain] I: found N xilinx devices
To review the configuration and available hardware, execute the xbutil examine command. For 2 GPUs instance, the output should look like the one below.
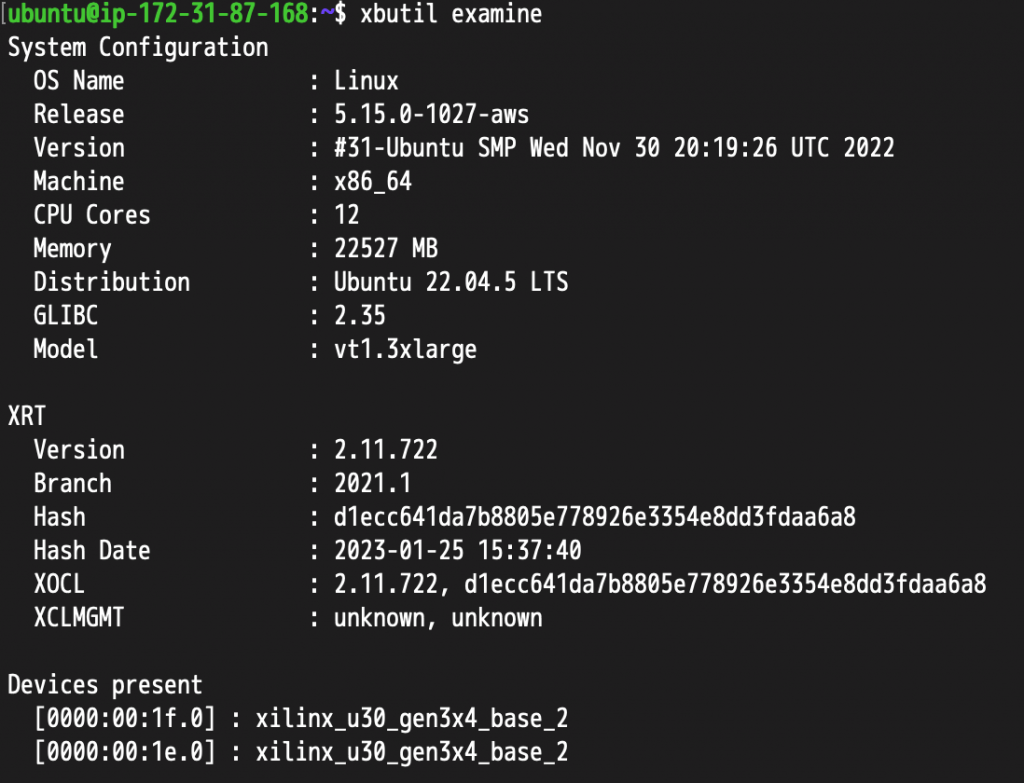
Please include the output of this command in your requests to our support if you submit one.
Now let’s move on to the setup of Alveo U30 in Nimble Transcoder.
Create transcoder scenario
Log into WMSPanel and click the Transcoders item in the top menu. If you are unfamiliar with Transcoder’s UI, you may see the following excerpt from our video tutorial.
Make sure that the server selected in a drop-down box is the one with the Alveo U30 GPU and click Create a new Scenario to define the transcoding pipeline. Then re-name it by clicking the ‘pencil’ icon. The Out-of-process mode can also be checked here for better stability.
Alveo U30 Decoder options
When the input stream is processed by the Transcoder, it first goes through the decoder.
Notice that the decoder supports only resolutions which are multiples of 2. If you use the scaler filter (see more details below), it allows using only resolutions that are multiples of 4.
Place the decoder block by dragging the Video source element from the Transcoders UI to a video pipeline and specify the input application name and stream name in the opened dialog box. To utilize the Alveo U30’s hardware decoder, select the Decoder option as AMD Alveo.
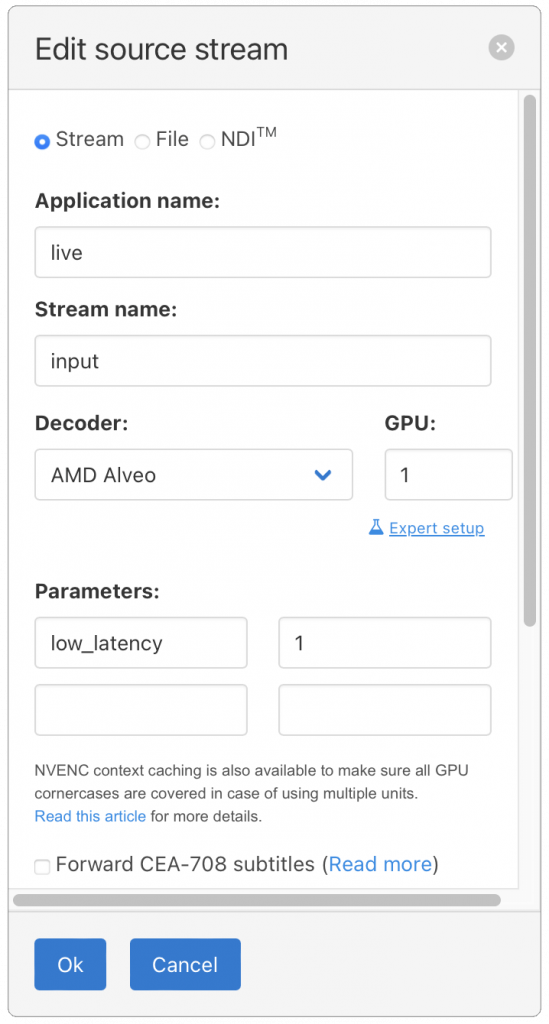
If you have the server with multiple Alveo cards, such as our AWS VT1 instance, the GPU number can be specified to distribute the processing load. To stay within the same hardware pipeline, it’s essential to ensure that the GPU number assigned to the decoder matches the GPU number used by the encoder. Different GPUs for the decoder and encoder can be utilized via software frames, as described in the corresponding section below.
When you click Expert setup, additional decoding parameters become available. These settings are designed to achieve lower latencies or improve performance during decoding. The following options are supported:
- low_latency: Enables low-latency mode. Valid values: 0 (default) and 1. Setting this to 1 reduces decoding latency, particularly when splitbuff-mode is enabled. B-frame streams are not supported in low latency mode.
- splitbuff_mode: Configures the decoder for split/unsplit input buffer mode. Valid values: 0 (default) and 1. Split buffer mode reduces latency by handing off buffers earlier.
- entropy_buffers_count: Sets the number of internal entropy buffers. Valid values: 2 (default) to 10. Increasing this value can improve performance for high-bitrate streams or streams with many reference frames. Value of 2 is sufficient in most cases, with 5 being a practical limit.
Notice 1: All additional forwarding options in the ‘Expert setup’ section (SCTE35, KLV, DVB subtitles, WebVTT subtitles, SEI, and CEA708) including the ‘PTS adjustment’ option are supported for the Alveo U30 decoder.
Notice 2: The ‘Default’ or CPU decoder can also be used. In this case, the stream will be decompressed into ‘software’ frames, which will allow using a variety of CPU-based filters, e.g. ‘picture’ or ‘drawtext’.
Adding Alveo U30 hardware scaler
Alveo U30 has a built-in hardware scaler (a.k.a. multiscaler). It takes one input and generates up to 8 output streams.
Notice: As was mentioned earlier, the decoder supports resolutions that are multiples of 2, while the multiscaler is limited to resolutions that are multiples of 4. As a result, pipelines that are using both the decoder and the multiscaler will only function properly for streams with resolutions that are multiples of 4.
This hardware scaler is added via the custom filter named multiscale_xma to the Transcoder scenario.
Drag the Сustom video filter element to a pipeline. Enter multiscale_xma as a filter name to add the scaler into the pipeline.
Unlike ABR scenarios for other types of decoders/encoders, the Split filter is not required before the scaler in this case. The Alveo AMD decoder can be directly linked to the multiscale_xma filter. The scaler can produce multiple outputs to different U30 encoders without additional elements. However, there’s a way to use different GPUs as output, but it needs to use software frames and we discuss below.
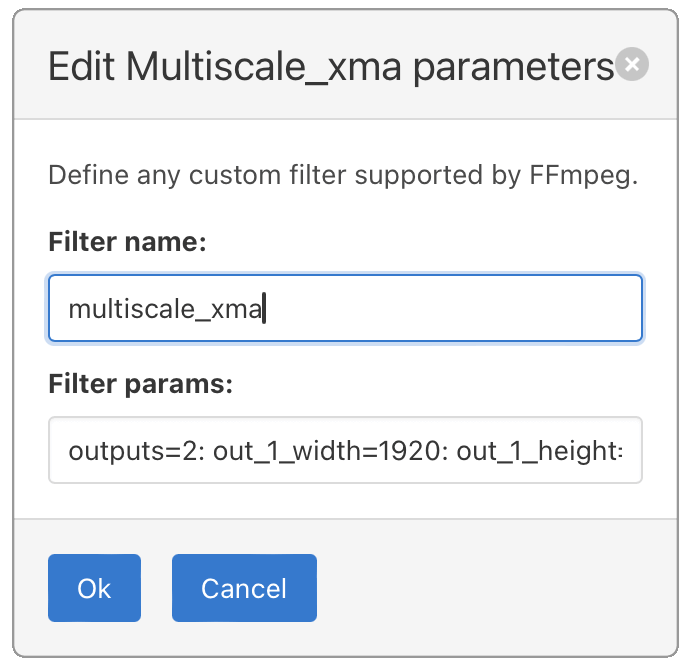
The Filter params will define the number of outputs and the scaled resolutions for each output along with some other performance options. To construct the scaler parameter string for the Xilinx U30 ABR multiscaler, follow these steps:
- Define the number of outputs:
Use the ‘outputs’ option to specify how many scaled outputs the filter will generate. Valid values are integers between 1 and 8. - Set the width and height for each output:
For each output, specify the width and height using ‘out_{N}_width’ and ‘out_{N}_height’ , where {N} is the output number (from 1 to the number of outputs). The width should be a multiple of 4, between 128 and 3840, while the height should also be a multiple of 4, between 128 and 2160. - Set the frame rate for each output:
The ‘out_{N}_rate’ option sets the frame rate for each output. Valid values are ‘full’ (default) and ‘half’. The first output must always use the full rate. - Enable or disable pipelining:
Use ‘enable_pipeline’ to control pipelining, which can enhance performance but adds 2 frames of latency. The values can be:- -1 (auto): Pipelining is enabled automatically based on input.
- 0 (disabled): No pipelining.
- 1 (enabled): Pipelining is always enabled.
Here’s the example of a parameters string to configure 1080p and 720p outputs with FPS rate half of the input’s FPS (for 720p) and improved performance:
outputs=2: out_1_width=1920: out_1_height=1080: out_1_rate=full: out_2_width=1280: out_2_height=720: out_2_rate=half: enable_pipeline=1
After clicking Ok, you can add the encoders (as mentioned below), and drag lines from multiscale_xma filter to the encoders. Make sure the encoders use the same GPU number.
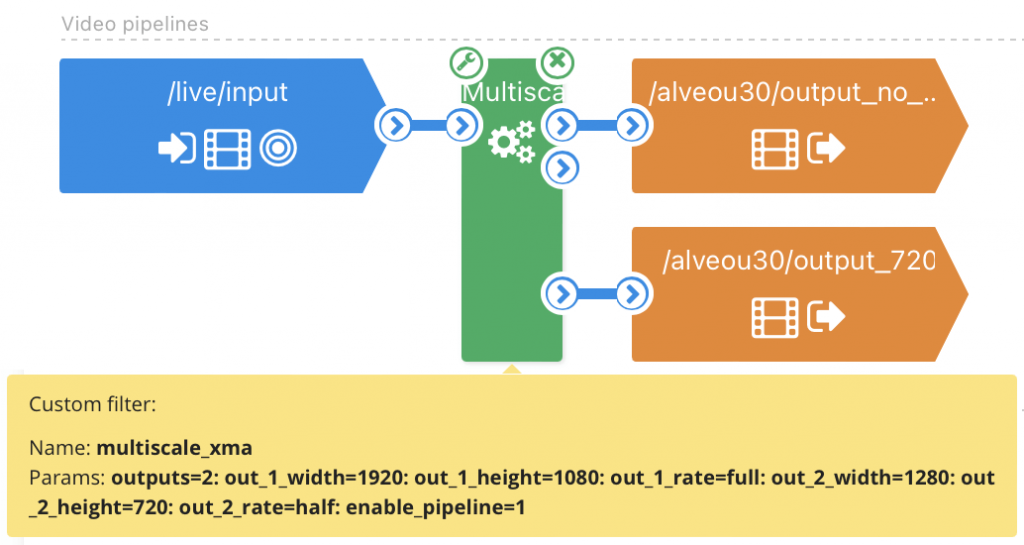
For your convenience, here’s a scaler line for Filter params field to generate ABR ladder for 5 resolutions from 1080p to 160p:
outputs=5: out_1_width=1920: out_1_height=1080: out_1_rate=full: out_2_width=1280: out_2_height=720: out_2_rate=full: out_3_width=848: out_3_height=480: out_4_width=640: out_4_height=360: out_5_width=288:out_5_height=160
With all outputs connected to encoder elements, the scenario looks like this:
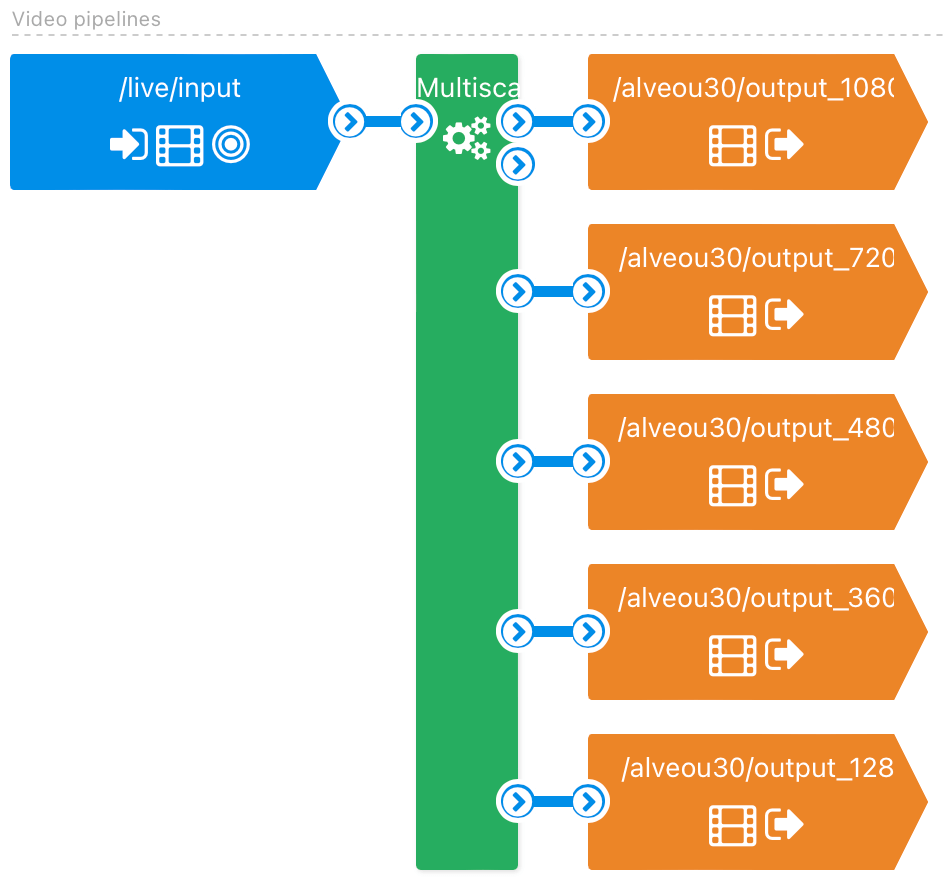
The Audio pipelines are not specific to U30 and are performed on the CPU. They are set the same way as for any other scenario, and they’re are not discussed in this article.
Utilizing software frames for CPU filters and multi-GPU workflows
The Alveo U30 is not restricted to its native hardware pipeline, it can be extended by using common filters such as Picture or Drawtext, which are processed on the CPU. Additionally, software frames can be routed to other Alveo U30 GPUs for further processing. To enable this, use xvbm_convert custom filter after the decoder, followed by any other filter available in the Transcoder UI. To apply this filter, simply drag a custom filter onto the pipeline and enter xvbm_convert in the Filter name field. No filter params are needed.
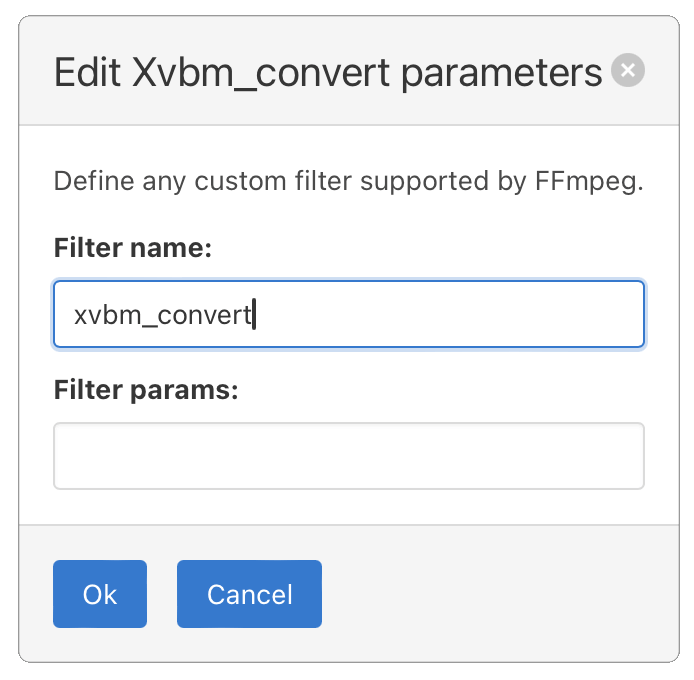
The U30 encoder does not require software frames to be converted back into its native hardware format (XVBM), this allows linking the filter output directly to the Alveo encoder. The output from these filters can also be used as input for the multiscale_xma scaler, which accepts software frames.
Additional technique involves using xvbm_convert to route the output of a scaler to another Alveo U30 GPU within the same system. Hardware frames from a decoder on one GPU cannot be used on other GPUs, however, you can place xvbm_convert after the multiscale_xma scaler and specify a different GPU using the gpu parameter for the encoder. In this case, multiple hardware encoders can be utilized concurrently for the same original input stream in adaptive bitrate (ABR) scenarios.

Notice about 10-bit support
The xvbm_convert filter does not support converting 8-bit frames to 10-bit frames. This means that 10-bit sources can be processed within Alveo’s hardware pipeline, however, without software filters.
Alveo U30 encoder options
To add the encoder into the pipeline, drag Video output and specify the output stream application by giving it a unique name. Select FFmpeg as the encoder, then click on a codec field to get the list of possible codec values:
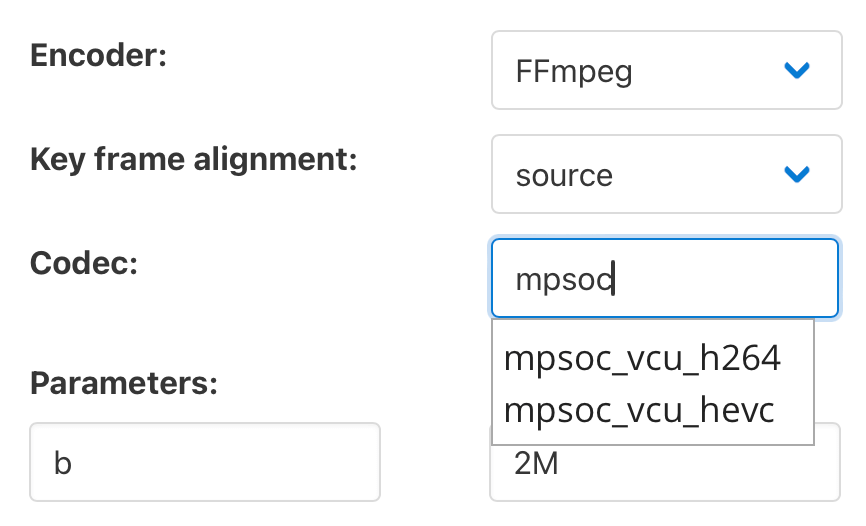
Alveo U30 supports the following values for the respective codecs:
- mpsoc_vcu_h264 for H.264/AVC
- mpsoc_vcu_hevc for H.265/HEVC
You can either type the value or just select by clicking it from the list.
For more detailed information on these codecs and their capabilities, please refer to official Xilinx Video SDK documentation.
Additional encoder options can be set in the input fields in Parameters section. Below are the most commonly used options:
- gpu: A U30 GPU number in a system, must be equal to decoder number in a pipeline. The exception is the case of software frames, see filters section above for more details. Values: 0-4.
- b: Specifies video bitrate. Can be set in Mb (e.g. 1M) or Kb (e.g. 1000K).
- max-bitrate: Limits the maximum encoding bitrate. Default is 5000000 (5 Mbps).
- aspect-ratio: Specifies the aspect ratio. Valid values:
- 0: Auto (4:3 for SD, 16:9 for HD), default value
- 1: 4:3
- 2: 16:9
- 3: None (no aspect ratio information in the stream)
- cores: Specifies the number of encoder cores to use (0 for auto), 0 by default. Useful for scaling performance with higher resolutions like 4K.
- slices: Defines the number of slices to process simultaneously. Default is 1. For real-time encoding of 4K streams, set to a higher value, up to a practical maximum of 4.
- level: Sets the encoding level, based on resolution, frame rate, and bitrate. Valid values range from 1 to 5.2 for H.264, and 1 to 5.2 for HEVC.
- profile: Specifies the encoding profile. For H.264, valid options include baseline, main, and high. For HEVC, main profiles are supported. Refer to U30 docs for more info.
- tier: Available for HEVC only. Specifies encoding tier:
- 0: Main tier (default value)
- 1: High tier
- bf: Specifies the number of B-frames. Default is 2. Lower values can reduce latency but may impact quality.
- control-rate: Sets the rate control mode:
- 0: Constant QP
- 1: Constant Bitrate (default value)
- 2: Variable Bitrate
- 3: Low Latency
- min-qp and max-qp: Set the minimum and maximum QP values for rate control, ranging from 1 to 51. Default value for min-qp is 1 and for max-qp it’s 51
- periodicity-idr: Specifies the frequency of IDR frames. By default, IDR frames are aligned with the GOP size. To insert IDR frames less frequently, use a value which is a multiple of the GOP size.
- force_key_frames: Forces the insertion of IDR frames at specified times. Please refer to documentation about its usage.
- disable-pipeline: Enables Ultra Low Latency (ULL) encoding for live streaming. Valid values: 0, 1 (default is 0=disabled)
For the full list of parameters, values and their descriptions, please refer to official documentation page.
Additional forwarding options in the Expert setup section (Forward DVB subtitles, Forward WebVTT subtitles, Forward SCTE-35 markers, Forward SEI timecodes and Forward KLV metadata) and PTS Adjustment option are supported for U30 encoder as well.
This article showed the set up of an environment for using Nimble Streamer with AWS VT1 instances and the AMD Xilinx Alveo U30 accelerator in general. If you encounter any issues or require additional support, don’t hesitate to reach our helpdesk.
Alveo MA35D hardware acceleration support
Alveo MA35D support has also been added into Nimble Streamer Live Transcoder.
Let us know if you’d like to get MA35D hardware acceleration for your media server, we can provide proper build and instructions for that.