The Nimble Streamer team has recently introduced speech recognition and translation for live streaming powered by Whisper.cpp AI engine. It’s an important feature set that allows live content to be more accessible for any audience and improve overall user experience.
In this article, we’ll describe how to enable and set up automatic voice recognition and translation in Nimble Streamer. The result of transcription is delivered as WebVTT subtitles in HLS output stream.
Notice that Nimble Streamer has full support for all types of subtitles and closed captions.
Prerequisites
In order to enable and set up transcribing in Nimble Streamer, you need to have the following.
- WMSPanel account with active subscription.
- Nimble Streamer is installed on an Ubuntu 24.04 and registered in WMSPanel. Other OSes and versions will be supported later.
- The server with Nimble Streamer must have a NVIDIA graphic card with proper drivers installed.
- Live Transcoder is installed and its license is activated and registered on your Nimble Streamer instance. You can do it easily via panel UI.
- Addenda license is activated and registered on your Nimble Streamer instance.
Installation
In order to add Whisper.cpp transcription engine and model, run the following command and restart Nimble instance.
sudo apt install nimble-transcriber
sudo service nimble restart
Enable recognition for live streams
Once your Nimble instance has the speech recognition package, you may enable transcription for that server in general as well as for any particular live stream.
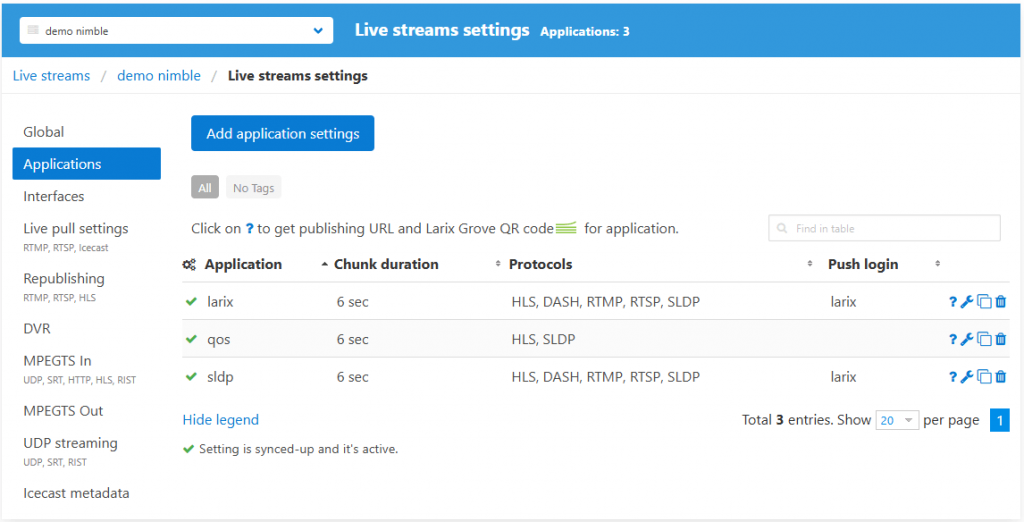
To enable transcription, go to Nimble Streamer top menu, click on Live Streams Settings and select the server where you want to enable transcription.

Select particular output application where you’d like to enable transcription, or create a new app setting.

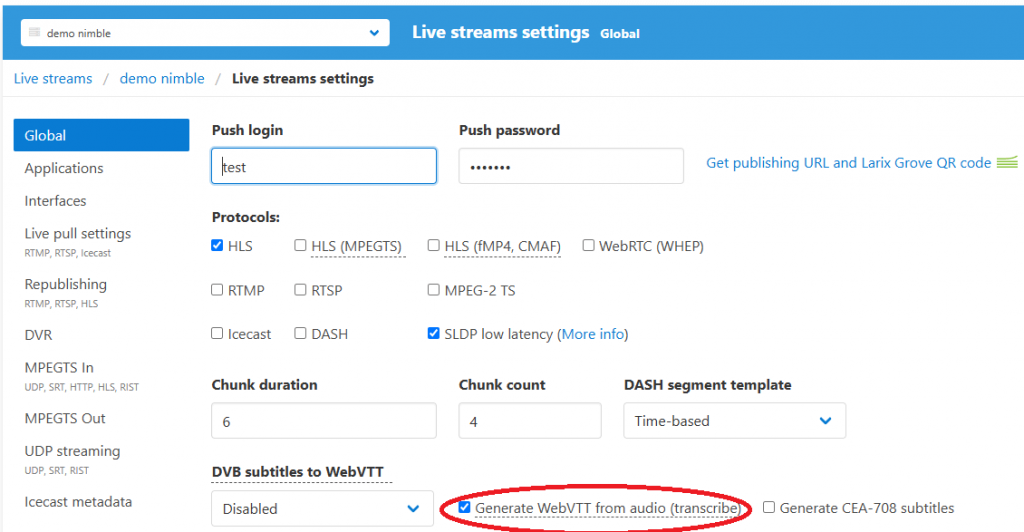
Check Generate WebVTT for audio checkbox and save settings.
If you’d like to enable transcription on the server level, open Global tab, enable the same option and save settings.
You may also enable the generation of CEA-708 subtitles, please read this article for more details.
After you apply settings, you need to re-start the input stream. Once the re-started input is picked up by Nimble instance, the output HLS stream will have WebVTT subtitles carrying the transcribed closed captions.
There are two ways to enable Whisper.cpp processing for Nimble instance – server-wide setting and per-stream setting.
Server-wide setting for Transcriber
Whisper.cpp library allows not just transcribing the stream but also translate it to another language. The setup related to server and live app settings are the same as described above. However, you need to add a new parameter in nimble.conf file:
transcriber_type = whisper
whisper_language = <language code>
A two-letter language code is used, like “en”, “es”, “fr” etc. like:
whisper_language = enThe language that you define in this parameter will be used for transcription and further translation of all streams that have voice recognition enabled. So if your source is in English and you set language to “en” then it will only run the transcription process. If that parameter is different – e.g. “es” – then transcription will be followed by translation. This way, all output streams’ subtitles will be in respective language, like Spanish.
“transcriber_type” parameter specifies that transcription is done by Whisper by default. It’s an optional parameter if you use only Whisper for transcription.
At the moment, only one language can be set on the server level. Nimble supports all languages supported by Whisper.
Also, don’t forget to restart the Nimble instance to make the parameter work:
sudo service nimble restartAdditional Nimble config file options
Besides the language parameter, you may also define the following settings in nimble.conf file.
transcriber_stream_limit – defines the maximum number of streams that are processed by the Whisper transcriber engine simultaneously. If the GPU cannot process them all in time, this will affect all streams being processed, and the subtitles will have a significant delay. So set this limit based on your hardware capabilities. By default, it’s 10.
whisper_model_path – if you use some other model other than basic, you may point Nimble instance to use it instead.
Please restart Nimble instance once you make any changes to the config.
Visit nimble.conf file page for more details about other parameters.
There are two ways to enable Speechmatics for Nimble instance – server-wide setting and per-stream setting.
Per-stream settings for Transcriber
By default, the languages for transcription and translation are defined on the server level. If you’d like to apply different languages besides the default one, you can specify full list of apps and streams with respective languages in a separate config. Use this parameter to define its location:
transcriber_config_path = /etc/nimble/transcriber-config.jsonChanges can be applied in this file without Nimble re-start. However, you need to re-start the input stream in order to transcribe it with the new language.
The content would be as follows.
{
    "whisper_params" : [
        {"app": "live", "stream": "stream", "lang": "en"},
        {"app": "live-2", "lang": "es"}
    ]
}
The following parameters can be used:
- “app” defines Nimble streamer application
- “stream” defines the respective stream. You may skip it, in this case the languages’ settings will be applied to all streams within the specified app.
- “lang” is the two-letter language code.
You may also use other optional parameters:
- “whisper_model_path” – a path to the model used for this particular stream, in case you want to use something instead of the default one.
- “use_gpu” is the Boolean parameter to define where you want to use GPU for that particular stream or not.
- “whisper_full_params” is a set of parameters for fine-tuning the processing:
- “n_threads” – number of CPU threads for processing if have “use_gpu”: false.
- “temperature” – initial decoding temperature, read here for more.
- “best_of” – number of candidates when sampling with non-zero temperature.
- “temperature_inc” – temperature to increase when falling back when the decoding fails to meet either of the thresholds below.
- “entropy_thold” – similar to OpenAI’s “compression_ratio_threshold”.
- “logprob_thold” – if the average log probability is lower than this value, treat the decoding as failed.
- “no_speech_thold” – if the probability of the <|nospeech|> token is higher than this value AND the decoding has failed due to
logprob_threshold, consider the segment as silence.
Here’s an example of full config:
{
    "whisper_params" : [
        {"app": "live", "stream": "stream", "lang": "en", "use_gpu": true},
        {"app": "live-2", "lang": "en", "whisper_model_path": "external/whisper/whisper.cpp/models/ggml-large-v2.bin"},
        {"app": "live", "stream": "stream-2", "lang": "en", "use_gpu": false,
            "whisper_full_params" : {
                "n_threads" : 4,
                "temperature": 0.0,
                "best_of": 5,
                "temperature_inc": 0.2,
                "entropy_thold": 2.4,
                "logprob_thold": -1.0,
                "no_speech_thold": 0.6
            }
        }
    ]
}
Whisper Speech-to-Text performance
Speech recognition is a heavy-duty task which requires a lot of computing resources.
At the moment our ASR implementation with Whisper base language model can only work with NVidia GPUs. They can handle all processing needed for this extraordinary task.
We’ve run some tests and we can tell that the following can be achieved using Nimble Streamer engine. The following hardware can produce the following input streams into output HLS with closed captioning:
– NVidia GeForce RTX3070 can process 17 input streams.
– NVidia GeForce RTX4050 can process 10 input streams.
We’ll share more details as we run more tests on other hardware.
Other AI captions integration
Nimble Streamer supports other speech recognition engines using various technology providers:
- Speechmatics ASR service
- KWIKmotion AI powered captions service.
You may combine multiple ASR engines on the same Nimble instance if you need some streams to be processed by some other AI model or service.
Please let us know if you have any questions, issues or suggestion for our voice recognition feature set.