Modern broadcast and production environments rarely live in a single signal world. SDI infrastructure and IP-based NDI workflows coexist on the same floors, in the same racks, and across the same projects. Bridging them cleanly — without quality loss, latency spikes, or an extra box in the chain is one of the more practical problems a system integrator faces today.
Nimble Streamer solves this directly. It supports both SDI and NDI as its inputs and outputs, and lets you route and transcode between them through a single, manageable pipeline. Whether you need to push a baseband SDI feed onto an IP production network as NDI, or bring an NDI source back out to SDI for a router or monitor wall, Nimble Streamer handles both directions with full transcoding control via the WMSPanel web UI.
This article walks through both conversion paths, explains where transcoding fits in, and covers two real-world workflow scenarios where this capability delivers tangible value.
Why SDI / NDI Conversion Matters
SDI (Serial Digital Interface) has been the backbone of broadcast signal routing for decades. It is deterministic, low-latency, hardware-synchronized, and universally supported by cameras, switchers, routers, and monitors. However, it is fundamentally point-to-point and tied to physical cabling infrastructure.
NDI (Network Device Interface), developed by NewTek/Vizrt, operates over standard IP networks. It allows video sources and destinations to be discovered and routed dynamically, enabling flexible, software-defined production topologies. NDI has become a standard in IP-based production, virtual studios, remote workflows, and cloud-integrated broadcast chains.
In practice, most facilities need both – SDI at the edges (cameras, hardware switchers, monitors) and NDI in the middle (production networks, software tools, remote contribution). Nimble Streamer sits at that boundary and converts cleanly in either direction.
Notice on OMT. Open Media Transport (OMT) protocol was created as an alternative for NDI. Nimble Streamer has full OMT support for both input and output for all scenarios that work for NDI. All pipelines described below are applicable to OMT as much as for NDI.
Prerequisites
Before configuring SDI/NDI routing in Nimble Streamer, ensure the following are in place:
- Nimble Streamer installed on Ubuntu 22.04 or Ubuntu 24.04.
- WMSPanel account with the Nimble instance registered in the dashboard.
- Nimble Transcoder is installed and its license is activated on the server.
- Blackmagic Design SDI capture/playout card installed and recognized by the OS. Nimble Streamer supports Blackmagic Design hardware (DeckLink series). Ensure the Blackmagic drivers are installed on the host system prior to configuring Nimble.
Full versions of setup articles are available for SDI input and SDI output, as well as for NDI detailed instructions. We recommend getting familiar with them in addition to this article if you’d like to make fully functional SDI/NDI pipelines.
Path 1: SDI input to NDI output
This path takes a baseband SDI signal from a Blackmagic DeckLink card and makes it available as an NDI stream on the IP network. A typical use case is feeding a camera or hardware switcher output into a software-based production environment.
Step 1: Identify available SDI devices
Once the latest Nimble Streamer and Live Transcoder packages are installed, run the nimble_sdi utility on your Linux server to enumerate all connected DeckLink devices:
/usr/bin/nimble_sdiThe output will list each device with its identifier and name, for example:
Found 4 SDI devices:
81:8c1580a0:00000000, DeckLink Duo (1)
81:8c1580a1:00000000, DeckLink Duo (2)
81:8c1580a2:00000000, DeckLink Duo (3)
81:8c1580a3:00000000, DeckLink Duo (4)
You’ll need a chosen device name for further setup. If the command fails, install the latest Blackmagic Desktop Video drivers (version 15.3 or newer) before proceeding.
Step 2: Determine the correct format code
The SDI decoder requires a format_code parameter that must match the signal format your hardware is actually receiving. To see the full list of formats supported by your specific device, build FFmpeg with DeckLink support on the same server and run:
./ffmpeg -y -f decklink -list_formats 1 -i 'DeckLink Duo (1)'This returns a table of format codes with their corresponding resolutions and frame rates (e.g., Hp25 for 1920×1080 at 25fps, Hi50 for 1080i/50). Note the correct code for your incoming signal — using the wrong one will result in a test pattern rather than your actual content.
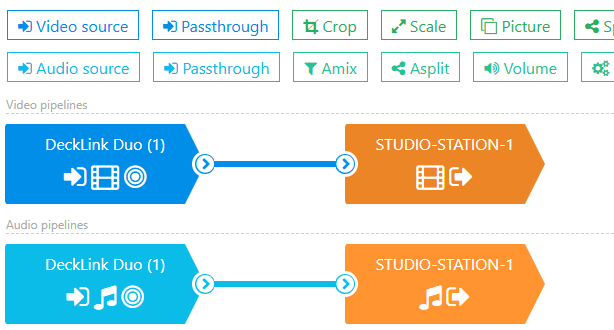
Step 3: Create a Transcoder scenario with SDI decoders
In WMSPanel, navigate to Transcoders and click Create new scenario. In the scenario canvas:
- Drag a blue video source element and select SDI (DeckLink) as the type.
- Set the SDI name field to the device name exactly as shown by the
nimble_sditool (e.g.,DeckLink Duo (1)). - Add the format_code parameter with the value identified in Step 2. If omitted, it defaults to
24ps, which may not match your signal. - Drag a blue audio source element, also select SDI (DeckLink), and set the same SDI name. Set the channels parameter to
2,8, or16depending on your audio configuration (default is2).
Step 4: Add video and audio encoders for NDI
Decoded SDI content must be re-encoded before it can be sent out as NDI. Add encoder elements to the scenario:
- Drag a green video encoder element and set the output type to NDI.
- Enter the NDI stream name, this is how the stream will appear to NDI receivers on the network (e.g.,
STUDIO-STATION-1). - Drag a green audio encoder element, also select NDI as the output type and use the same stream name as specified for the video encoder..
- Connect the video decoder to the video encoder, and the audio decoder to the audio encoder, by drawing arrows between them. Filters for scaling, frame rate conversion, or other transforms can be inserted between decoder and encoder elements as needed.
Once you click on saving the scenario, within a few seconds the scenario will sync to your Nimble Streamer instance, which will begin advertising the stream via NDI discovery. Any NDI-capable device or application on the same network, including vMix, OBS with the NDI plugin, Adobe Premiere, and NewTek hardware, will see it as a standard NDI source.
You can verify available NDI streams at any time using the nimble_ndi command-line tool included with Nimble Streamer.
Path 2: NDI input to SDI output
This path takes an NDI stream from the production network and sends it out as a baseband SDI signal — for example, to feed a monitor wall, hardware vision mixer, or broadcast router that does not speak IP.
Step 1: Identify available SDI devices
As with Path 1, run nimble_sdi to confirm which DeckLink devices are available on the server and note the name of the port you intend to use for output, see previous Path 1 for details.
Larix Broadcaster mobile apps have expensive support for NDI protocol and provide NDI output from Android and iOS devices. So the pipeline below may use Larix as its input, it will be discovered in the network the same way as any other NDI source.
Step 2: Determine the required output format
Just like was explained in Path 1 for SDI input, the SDI output must match the format expected by the downstream device. Use FFmpeg with DeckLink support to list the formats supported by your playout card:
./ffmpeg -y -f decklink -list_formats 1 -i 'DeckLink Duo (4)'Identify the format code that matches your downstream SDI device’s expected input (e.g., Hp30 for 1920×1080 at 30fps, Hi50 for 1080i/50). If the incoming NDI stream’s resolution and frame rate do not already match this format, you will need to apply filters in the transcoder scenario.
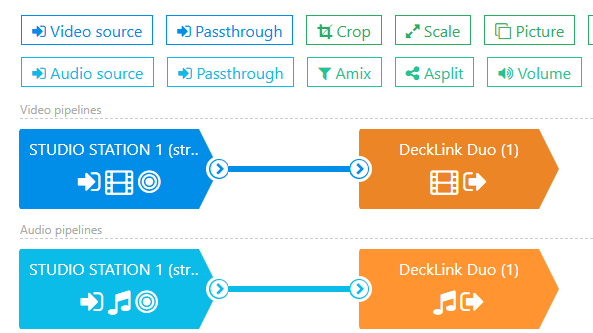
Step 3: Create a Transcoder scenario with NDI decoders
In WMSPanel, navigate to Transcoders and click Create new scenario. In the scenario canvas:
- Drag a blue video source element and select NDI as the type.
- In the NDI name field, enter the source stream name as shown by
nimble_ndi— this can include both host and stream name (e.g.,STUDIO-STATION-1(stream) - Drag a blue audio source element, also select NDI, and enter the same NDI stream name.
Step 4: Apply format conversion filters if needed
If the NDI source resolution or frame rate does not match the SDI output format identified in Step 2, add filters between the decoder and encoder elements:
- Add a Scale filter to adjust resolution (e.g., to reach 1920×1080 for
Hp30). - Add a Custom filter with an
fpsparameter to convert frame rate to match the target SDI format.
Both filters are placed in the video pipeline between the NDI decoder and the SDI encoder.
Step 5: Add SDI encoders for output
- Drag a green video encoder element and select SDI as the type.
- Set the SDI name field to the device name exactly as listed by
nimble_sdi(e.g.,DeckLink Duo (1)). - Drag a green audio encoder element, also select SDI, and set the same SDI name.
- Connect the video decoder (and any filters) to the video SDI encoder, and the audio decoder to the audio SDI encoder.
Now save the scenario. Within a few seconds the scenario will sync to Nimble Streamer and your DeckLink card will begin outputting the SDI signal on the designated port, ready to be patched into a hardware router, monitor wall, or any SDI-capable device downstream.
Real-World Workflow Scenarios
Scenario 1: Studio feed to IP-based production network
A broadcaster operates a traditional studio with SDI cameras, a hardware vision mixer, and a routing switcher. The production team is introducing IP-based tools – a software graphics system, a remote director workstation, and a cloud-connected encode farm – all of which communicate over NDI.
Nimble Streamer runs on a Linux server connected to both the SDI router (via Blackmagic Design DeckLink Duo or similar DeckLink cards) and the production LAN. Each SDI program output from the router is configured as an SDI source in WMSPanel, with a corresponding NDI output published to the network. Software tools on the IP side subscribe to the relevant NDI streams, eliminating the need for dedicated SDI-to-NDI converter boxes at each destination.
In the return path, graphic overlays and remote feeds generated as NDI on the production network are routed back through Nimble Streamer as NDI inputs with SDI outputs, feeding directly into SDI input ports on the vision mixer.
The result: a hybrid infrastructure that preserves the reliability of the SDI core while enabling full participation in an IP-based production workflow, with one server running Nimble Streamer as the bridge.
Scenario 2: Hybrid Cloud/On-Prem Broadcast Chain
A media company runs live event production with an on-premises SDI infrastructure at the venue and a cloud-based post-production and distribution pipeline. Remote editors and operators work from cloud workstations that use NDI as their primary signal transport.
At the venue, Nimble Streamer captures the program SDI feed and exposes it as NDI to a secure VLAN that tunnels to the cloud environment. Transcoding is applied at the Nimble layer to adapt the raw SDI signal to the bitrate and format profile that matches the cloud infrastructure’s ingest specification — reducing bandwidth requirements without sacrificing quality at the editorial layer.
In the reverse direction, finished packages and approved content are returned from the cloud as NDI streams and converted back to SDI at the venue for on-site playout, confidence monitoring, and transmission to the uplink truck. All routing and format adaptation is managed through WMSPanel without requiring manual reconfiguration of hardware at the venue.
Summary
Nimble Streamer provides a clean, software-defined bridge between SDI and NDI, in both directions, with transcoding, format conversion, and multi-stream routing managed entirely through the WMSPanel interface. For system integrators working across hybrid broadcast environments, this removes the need for dedicated hardware converters and consolidates signal routing into a single, remotely manageable platform running on standard Linux server.